| Although there are four ways of reproducing hibiscus
plants of a particular variety, only two are commonly used: cuttings and
grafting. The other two, tissue culture and air layering, are not used by
the average gardener. Hibiscus grown from seed always have seed variation,
particularly the later hybrids which may revert to the types used in their
formation. A plant grown from cuttings or grafts will be identical to the
parent plant in leaf, flower, growth etc. Cuttings Parts of a plant that are taken from it to be used for vegetative propagation are called cuttings. With hibiscus, parts of the stem are taken, and classified according to the type of wood as tip cuttings, medium wood cuttings and hardwood cuttings. Tip Cuttings These are usually taken in
summer, when the new growth is most vigorous. Proper handling of these
cuttings is of prime importance in successfully developing new plants. Do
not take a quantity of tip cuttings and submerge them in a bucket of water
for long periods. Simply submerge them in a solution of water and Formula
20 for a minute or so, then place them under a moist cloth or in a plastic
bag with some water sprinkled inside the bag. Keep them out of the sun to
prevent wilting. Take tip cuttings 10 15 cm (4 6 in) long. Make a clean
cut roughly at a 45 degree angle through an eye. (There is an eye at the
base of each leaf.) Dip them in a hormonal rooting powder suitable for
softwood cuttings, and place them in the rooting medium. This can be
coarse river sand, perlite and peat, vermiculite and peat, or a mixture of
perlite, sand and peat. If the leaves are large they should have the leaf
area reduced by half. The cuttings do better if placed in single
propagating tubes, however they may be placed in one community pot.
Glasshouses with misting devices are preferred for tip cuttings. For the
home gardener a small frame covered with clear plastic will do provided
the plants are sprinkled several times throughout the day to prevent
excessive transpiration. These are taken in autumn as the soft wood begins to
mature, and are mainly taken by nurserymen wishing to build up a stock of
the particular variety. These cuttings are not popular with home gardeners
because taking them removes flowering wood; also they do not have time to
establish themselves fully before the cooler weather arrives. Firm wood
slightly smaller than pencil thickness is selected and all but the three
top leaves removed. These are then reduced by half, and a diagonal cut
through an eye about 7.5 cm (3 in) below the bottom leaf is made on the
stem. The cutting is now ready for planting. Dip it into a medium wood
hormone powder (Seradix No 2) and plant in individual propagating tubes in
the same rooting medium as for tip cuttings. Place under glass or cover.
Do not repot until spring. The easiest way of propagating hibiscus is by hardwood cuttings taken the last month of winter or in early spring. This is the normal pruning time anyway, so avail yourself of the ample supply of wood. Make sure that you have a small makeshift glasshouse or coldframe ready to protect the cuttings from wind, prevent them from drying out, and provide the necessary extra warmth required to encourage root growth. Select strong, straight wood, pencil thickness or a
little larger. Weak twisted stems produce equivalent plants; the better
the wood the better the plants. Remove all the leaves, by bending them
backward against the stem or by cutting off with secateurs. Do not pull or
tug them particularly if they are a little dry, for they will strip,
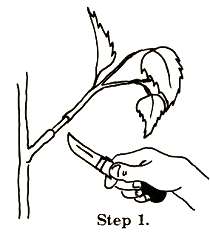
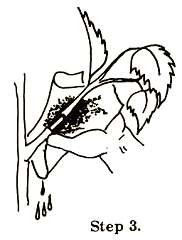
pulling out the eyes and tearing the bark. Using a sharp knife make a cut
at about 45 degrees through an eye at the base of the cutting, slicing
right through in one even stroke. The cutting is then trimmed to a length
of 12.5 - 15 cm (5 - 6 in). These cuttings may be placed either in
individual propagating tubes or in 15 cm (6 in) community pots, which will
hold about thirty cuttings. Hardwood cuttings seem to prefer coarse river
sand with a little peat mixed through it as a rooting medium, however
various mixtures of perlite and peat, or perlite, sand and peat have all
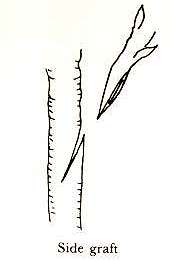
been successful. When choosing rootstock for grafting, species like H. schizopetalus that grow tall and whip like are not recommended. They are small in girth, and scions grafted on them will grow larger in diameter than the stock, resulting in weak grafts. We find that there are different understocks that are more suitable in different climates. For instance some growers use `The President' or `Pride of Hankins' (`Landersii') in their area in preference to `Albo-Lacinatus' and vice versa. A good guide is to study the older types of hibiscus in your area and select the strongest, hardiest, most vigorous and most disease resistant, particularly to root rots. You will find that there will be a number of varieties that you will be able to use as understock. The most commonly used methods are the side graft, tip
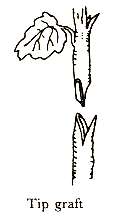
graft and veneer graft (see drawings). The variety to be grafted to the
root or understock is called a scion. This wood is cut into lengths
containing two or three eyes, showing green buds. Many growers wax the grafts to prevent drying out and to exclude moisture and disease organisms. Use grafting wax or grafting tar (Colgraft or Emastak). Using a small paint brush, paint the grafting wax over the entire graft, sealing it completely. You need not remove the wax, for it will break off as you remove the grafting tape. When using the grafting tar, completely seal the union of the scion and rootstock and the cut on the scion. Do not cover the buds or eyes! The success of the grafting operation is dependent upon acquiring a skill or `feel' in the procedure. It takes a certain amount of practice to get this feel and the more grafting you do the more proficient you become. You won't do it perfectly the first time, but each one you do after will get better. When pruning a bush save a long branch to practice on, making one slanting cut after another until you can make even, regular cuts that will match perfectly on the sides (without cutting your fingers). Get the best knife you can find made of good quality steel which will hold an edge; there are special grafting knives by various manufacturers including. Kunde which are designed for the job. Keep it clean and sharp and protect its edge from contact with other tools. Do not use it for any other purpose except cutting plant material, and apply a thin coat of oil or vaseline to the blade when not in use for any length of time. Learn how to hone a fine edge with a good fine grain carborundum stone and how to whet a razor edge. Grafting knives are sharpened on one side only, either for left or right-handed people. Lay the blade almost flat on the stone and sharpen against the edge as though you were cutting the stone, moving the blade toward you at an angle of about 30°. Some people prefer to move the blade in a circular motion on the stone. Be careful to keep the surface of the stone perfectly smooth and even. Remove any burs by stropping on leather or very fine emery paper. Plant fibres and acids in the tissues slowly erode and corrode the fine knife edge, so it should be stropped now and again. If you keep a raw potato handy and run the knife edge through it occasionally the potato will clean the knife and help it stay sharp longer. The knife should be able to slice through the stringy fibres of the wood at a small angle without bruising or tearing. It is important that the knife edge is keen enough to make smooth cuts that match perfectly with an even contact between surfaces. The popular utility knives with interchangeable blades may be used as long as the user takes care, for they are very sharp. They are also cumbersome, but with practice one becomes just as proficient with them as with the normal knives. The changing of blades takes but a second and one is always assured of a very sharp edge. Stick to a well known brand such as Stanley, for the blades of some brands are of inferior steel with poor cutting edges. Always try to match the thickness of the scion with an
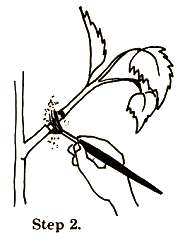
understock of the same thickness. This is not always possible and it is
not necessary to match both sides of the cambium layers, one matching
cambium layer sufficing, but a better union will result if both sides are
matched. The cambium is the soft green layer of tissue between the white
wood and the bark. Without touching the cut surfaces with the fingers,
match them and bind tightly together with plastic grafting tape. Sometimes
Twistems can be used. Rapid healing of the graft union is necessary so
that the buds of the scion may obtain water and nutrients from the
rootstock by the time they begin to sprout. The Wedge or Cleft Graft There is a variation to this which gives the grafter an even better union. After the top of the rootstock has been removed and the cut made down the middle, the bark is peeled back on one side. The section of white wood now visible is cut out for a length of about 2.5 cm (1 in), and the scion wedge, cut less acute than before, is placed against the remaining white wood with the cambiums matching. The bark is placed against the other side of the scion. This union is more uniform and is advised when grafting wood over 13 mm ( ½ in) thick.
Tip Graft While it is possible to place many grafts of different varieties on a single large bush, this is not advised unless the growth patterns of the varieties grafted are identical; if there are various growth habits in the scions, the stronger main plant will prevail. However it is possible to place many grafts on the one bush and remove them once they have taken either by air layering or by cutting them off and treating them as cuttings. Cutting Grafts Many hard to propagate and slow growing varieties have been successfully grafted, and when these varieties are placed onto a strong, hardy, disease resistant root system the results are amazing. They perform so much better than most and more hybrid hibiscus are now being grafted. Always look for grafted plants of later varieties particularly if you live in a cooler area. Most nurserymen now graft the varieties which in their opinion warrant grafting.
|
|||||||||||