|
2. Hibiscus rosa-sinensis Rose of China, China Rose, Shoe Black Plant. The species of hibiscus which seems to have the greatest number of variants is Hibiscus rosa sinensis. These plants appear to have innumerable variations in colour and shape in both single and double forms, due to the interest in these plants by early hibiscus fanciers who hybridised Hibiscus rosa-sinensis with other compatible species. Ross Gast in his Genetic History of Hibiscus rosa-sinensis traces the early movement of these plants and the hybridisation with other species which has led to the abundance of cultivars available today. Special variations were perpetuated by the taking of cuttings. Although generally considered to be native to continental tropical Asia, the species is unknown in the wild and its area of origin is conjectural. Gast however believes it to be from India due to the fact that Polynesian people supposed to have originated in India may have brought the species to China and the Pacific in the centuries of their Eastern migrations. Because it reached its highest development as an ornamental plant in China, and as most early cultivars were collected there and shipped to Europe, the species was given its name rosa-sinensis or Rose of China (China Rose). It is interesting to note that the earliest forms collected were of the double form, these were found growing around ancient temples and palaces in China, and the single form was not connected with the species for some considerable time. A double red form of H. rosa-sinensis was illustrated and described by Van Reede in 1678, and a double red and other forms were introduced to England by Philip Miller, curator of the Chelsea Physic Garden, London as early as 1731, under the name of H. javanica, indicating them to be natives of Java. Cook and other Pacific explorers found the double red form cultivated in several island groups. This form is still common in all parts of the world where hibiscus are grown. The single red form of H. rosa-sinensis is also known as 'common red', 'sinensis' or 'camdenii', and it is the national flower of Malaysia and the State of Hawaii.
This flower when crushed turns black, yielding dark purplish dye used in India for blacking shoes (hence Shoe Black Plant). In China it is used by women to dye hair and eyebrows. It is also used to colour liquors and to dye paper a bluish purple tint which reacts like litmus. Hawaiians eat raw flowers to aid digestion and the Chinese pickle and eat them. The red hibiscus was considered a sacred flower in Polynesia, for an early writer speaks of a native being clubbed to death for wearing the flower over his ear in front of a temple. A Polynesian myth tells of a beautiful woman whose beauty was destroyed by a witch; her hair and brows were restored by the juice of the hibiscus. According to Tahitian lore the hibiscus was created from the ruddy face of man, and a hibiscus bloom worn over the right ear shows that a person is looking for a mate, if over the left ear a mate has been found. In Hawaii real interest in hibiscus culture began at the turn of the century. The common red seems to have been brought in at an early date from China and this was crossed with the species native to Hawaii and with H. schizopetalus to produce some spectacular results. One of the first persons who became interested in hibiscus was Gerrit Wilder, who seems to have held the first hibiscus show in 1914; he exhibited some 400 different varieties. In the years following, interest was very widespread until there were literally thousands of different forms and colours. In 1923 a law was passed making the hibiscus the flower of the Territory of Hawaii. Single blooms are known as aloala lahilahi and the double forms as aloalo pupupu. The enthusiasm for exotic new hybrids spread to mainland United States with most interest generated in Florida, where, in the hope of providing some solution to the problems of identification and naming of varieties, as well as promoting interest in the cultivation of H. rosa-sinensis, the American Hibiscus Society was formed in the 1950s. The publication of the first official nomenclature list of the American Hibiscus Society in 1955 was the first step in recording and registering many of the magnificent cultivars available and being produced by eager breeders. Across the Pacific in Australia interest in
the species was aroused by the arrival of around thirty new varieties from
India, imported by the Brisbane City Council to be used in a street
planting program. The new arrivals proved very popular and it was not long
before these varieties were available through nurseries to the public. The
history of hibiscus in Australia dates back to the early 1800s. when John
Macarthur, the man responsible for introducing the merino sheep to
Australia, planted some of the single common red around his property at
Camden, N.S.W. Subsequent cuttings from these plants were labelled 'camdenii',
a name still used in nurseries today. Hazlewood Nurseries of N.S.W. listed
about twenty varieties in their catalogues during the 1930s and sometime
around 1946 the first Hawaiian hybrids notably 'Cameo Queen' and 'Mrs
Tomkins' arrived. The late 1950s saw more varieties imported from Fiji and
Hawaii. The huge colourful flowers of the Hawaiian hybrids were so
superior to most other varieties that these were classified as 'Hawaiian
hibiscus' a name that still persists for most large flowering exotic
hybrids, whereas hybrid hibiscus would be a more correct name for these
varieties. In October 1967 the inaugural meeting of the Australian
Hibiscus Society was held with Jim Howie as Foundation President. Like its
American counterpart the Australian Society has prospered and the exchange
of information and ideas between members has resulted in bigger and better
hibiscus for all. Why is this flower so popular? How can one describe the beauty of hibiscus? Many people are unaware of the broad range of colours, colour combinations and flower forms. Today there is almost unlimited variation in shades of colour. The flowering of most cultivars or varieties varies in different sections of the state and country. Generally, blooms are more plentiful during the period of most vigorous growth. Flowering season for most varieties is nearly the whole year round, but some flower less during the winter months or in hot weather. This is no doubt due to the complex breeding of these different varieties. Colour shades will vary according to the weather, temperature, amount of sunlight and time of day! The individual flower of hibiscus usually lasts but for one day, however another bloom takes its place as soon as it dies and for this reason the plants appear to be always in bloom. The best flowering time in most climates is usually .summer and autumn. As the days get shorter and the weather cooler, the buds build up and on warm autumn days explode in a blaze of colour! The flowers last longer in the cooler autumn weather than in the heat of summer, however some modern longlasting varieties will last two to three days even in the very hot weather. Growth habits differ between cultivars: plants may range in height from 90 cm to 6 m (3 20 ft) and vary from semi prostrate to upright in shape. The hibiscus possesses the unusual trait of not wilting after it is picked. Whether left on the shrub, picked and put in water or laid out dry on a table top the flowers remain fresh and crisp. Picking buds early in the morning before they begin opening and placing them in a refrigerator retards opening. When removed later in the day or early evening the buds open and complete their normal cycle. Buds may be held back for one or two days, which is very handy when one is entertaining guests. The flowers can be used for many forms of floral decoration, but surprisingly are not successful for leis because they are easily crushed and may stain clothing. With so many virtues it is little wonder
that H. rosa-sinensis has been called `queen of the tropical
flowers'. As mentioned previously hibiscus range in
growth characteristics from low, prostrate, sprawly shrubs to small trees
6 m (20 ft) high. In shape they may be: These characteristics should be considered
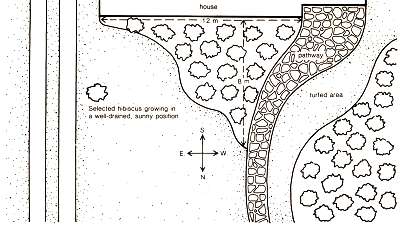
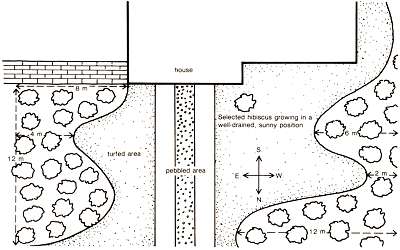
when hibiscus are chosen for planting in a certain position. Choose a hibiscus to suit the position, choose one in the right height range: too often we see a huge plant next to a front gate, blocking the entrance and making entry awkward, particularly in wet weather. Sometimes we see a nice hedge punctuated by gaps where lower growing plants were chosen. Today it is possible to obtain hibiscus tailor made to your requirements. Remember before planting that hibiscus prefer to be planted on their own, and to obtain optimum results prepare a special bed for them. Do not plant amongst other shrubs where they have to compete for food, light, water and sun. Half a day's sun is the minimum requirement. While hibiscus are reasonably salt tolerant, in coastal areas the danger of salt injury cannot be ignored. Hibiscus will not stand dune conditions and suffer severe injury or die where winds saturate large areas with salt spray. Hosing of the foliage regularly in such areas is necessary to prevent salt burn caused by the build up of salt on the foliage. Plants should be protected from these winds if at all possible by using buildings, fences, screens or trees for protection. Future maintenance of the planted area should be an important consideration in the planning stages. A garden that requires continual and expensive maintenance can be a heavy burden on the homeowner, and the joy he expects to receive can be lost. Work out landscape plans in advance, deciding on the type of plants needed, location, spacing and balance so that form and colour will harmonise into an attractive whole.
Preparing the Garden Remember in your planning that some varieties of hibiscus only grow to about 90 cm (3 ft) tall, while others grow to about 6 m (20 ft). Most modern hybrids can be kept to around 1.2 - 1.8 m (4 - 6 ft). Garden beds should always be built up to
ensure your hibiscus have adequate drainage to their root systems.
Attractive stone or cement edging can be used in construction, thus
allowing you to build up your soil behind them. To create garden beds in a
new area, chip any existing grass or weeds off the surface, without
breaking into the subsoil excessively, then build up the soil level by
using a good sandy loam, neutral to acid in nature with good compost or
organic matter mixed evenly through it in the ratio of three parts soil to
one part compost. Try to avoid heavy, sticky soils as it is easier to
build up a poor sandy soil than break down a heavy one. Care should be taken when keeping plants in containers for several weeks before planting. Remember the plants have just come from a nursery where they have been nurtured daily, so do not forget to inspect them each day. Place them in the full sun and never let them dry out; plants in containers do dry out rapidly in warm weather. Do not attempt to plant dried out plants; a good way to guard against this is to soak the container in a tub or bucket of water for about ten minutes, but make sure that you let it drain thoroughly afterward, otherwise the plant, soil and all could collapse in a soggy heap after removal from the container. Do not plant too deeply! Dig your hole
slightly larger and deeper than your container and the plant should be
planted at approximately the same level as it was in the container or just
slightly deeper. The soil should be made firm around the plant with light
pressure applied by the feet. When the area has been planted a suitable
mulch should be applied and the area thoroughly saturated, preferably with
a sprinkler. Enough room should be given the plant to
permit it to mature without undue cramping or crowding. In a hedge using
standard hedge varieties, space dour hibiscus at least 1 m (3½ ft) apart;
a spacing of 1.2 m (4 ft) is better. In a bed or group planting using the
better hybrids, allow 1.2 m (4 ft) between all plants. Against the house,
try to keep at least 60 cm (2 ft) from the foundations, with spacing of
1.35 m (4½ - 5 ft) between plants to allow air and light to penetrate. Insert a hardwood stake as near to the
plant as possible without interfering with the roots and drive it down
until it feels firm; this depth will vary for different soil structures.
Tie the plant to the stake using some of the non chafing twines available
even nylon stockings will do. Do not tie the plant too tightly as this
will restrict stem growth, and never use wire or strong cord as this will
cut into the stem. For large plants steel star posts are recommended.
Wooden stakes should be checked occasionally for rot and replaced when
necessary. Time to transplant: Warm
areas late winter or early spring. Colder areas mid to late spring. Time is well spent in deciding the new
location for plants to be moved. A plant site which will add to the beauty
of the area is to be sought, but whether the plant can withstand changes
in sun, shade, wind exposure and drainage conditions has a more direct
bearing on the plant's survival. Different kinds of hibiscus vary in their
growing habits, their need for sun, and the time of year they bloom best.
None of them like wet feet for long periods of time, some of them are not
very tolerant of salt spray, others need some protection from wind if they
are to keep in good condition. Remember that a transplanted hibiscus
should have space available above and below the plant as it grows. Roots
need room to spread. If the shrub is to be well shaped, the top of the
plant should be free to develop properly. Some varieties grow low, wide
and sprawly, others tall and compact; be sure to take the growth into
consideration when choosing the spot for relocation. Transplanting failures can often be traced to injury sustained by the roots when the plant is dug. Before digging the plant, cut the branches back one third overall. Circle the plant with a small trench, going out 30 cm (12 in) for each 2.5 cm (1 in) of trunk diameter. To avoid disturbing uncut roots, dig straight down, not on a slant, with a sharpened shade. Actual digging for the removal of the plant should begin from the outer edge of the plant's crown, with soil carefully removed as you work nearer the trunk, until the main roots are located. Retain as much soil around the roots as possible for root protection. Ease a piece of hessian, at least a metre
square, down in the trench. Carefully work it under the ball of soil and
roots enveloping them. Bind this ball with twine or cord to facilitate
removal from the hole with least loss of soil, or drying of the roots will
result. With large, heavy specimens, it may be necessary to roll the ball
onto a tarpaulin or rug to drag or skid the heavy plant to its new
location. The plant will recover better if partly shaded with hessian or
other fabric for the first week. A watering with hormone 20 or other root
growth promoting hormone after transplanting will be beneficial, and
frequent sprinkling of the top with water is effective in reducing
evaporation. Soil at the bottom of the hole should be
loose for good drainage. The plant should sit at the same level it was
before being moved. Place the plant in the hole at the right level, then
fill three quarters of the hole with soil. Water and tamp down lightly to
remove any air pockets that may be present. Drive in stakes to secure the
plant, and fill the remaining part of the hole with a good mixed soil or a
mixture of soil and peat moss. Newly transplanted hibiscus should be watered thoroughly every second or third day for 4 6 weeks, watering until water no longer seeps rapidly into the soil. One or two further applications of hormone 20 is also recommended during this period. Allow the surface soil to dry before watering again. Test the soil for dryness by crumbling it through your fingers, lack of water causes the roots to dry up and die, and excessive water is likely to rot the roots. Light watering causes the production of surface roots. Mulching with a 10 cm (4 in) layer of commonly used mulching material is valuable in retaining moisture. Mulch should be kept about 10 cm (4 in) away from the stem to prevent damage by fungus and decay. When transplanting one hibiscus to a position where another hibiscus was growing it is advisable to remove a fairly large portion of the soil and replace it with fresh soil. This will replace some of the trace elements needed by hibiscus and ensure the plant has a good start. Finally, never attempt to transplant your
hibiscus in late autumn or winter! Fertilise regularly throughout the winter using a balanced fertiliser (one with roughly equal amounts of nitrogen and potash), but apply less fertiliser than you would during the flowering season. Regular monthly applications of fertiliser in moderation will help your plants remain healthy and strong and in the best condition to withstand the cold of winter. Banking plants has been very effective in protecting them from severe frosts. This requires piling up a mixture of wood shavings, leaf mould or soil in a mound 30 - 40 cm (12 - 16 in) above the level of the ground completely around the trunk. This protects the roots of the plant. On banking a grafted plant, the pile should be carried above the graft whenever possible. Often a cylinder of chicken wire helps to keep the material intact. Banking should not be removed until the danger of frost and cold weather is past. If you do not bank your plants, then remove any mulch from underneath them. This will help slightly in winter as the mulch tends to insulate plant tops from the higher temperatures of the ground. Cover the hibiscus to take advantage of heat stored in the soil and plant. This warmth is radiated into the atmosphere, but returns to the ground if it strikes some kind of cover such as trees or structural overhang. Newspapers, cardboard, burlap and old blankets serve the same purpose. This covering should be placed over the plants without touching the foliage, otherwise heat will be lost through the leaves through conduction at the point of contact, and plants may be damaged there. A light portable frame with cover to protect the plant down to the ground is ideal and may be made in the home workshop. Polyethylene or plastic sheeting can also be used as cover. Clear plastic can be brought in varying thicknesses from building supply stores. It comes in 30 m (100 ft) rolls and is usually 4 m (12 ft) wide. This is the best width as it will completely cover a large group of plants in the ground or in containers. It is almost transparent, which permits sunlight penetration, providing heat in the daytime, even though the temperature outside the covering would damage the plants. Provide support poles, boxes, wire, or other means of support to prevent the plastic touching the plants. To secure an airtight enclosure, the outside edge can be kept tight with the ground by spading mounds of soil or by piling bricks or stones along the edges. When the temperature is expected to drop below freezing, use a few 150 watt light globes placed inside the covering well away from the plastic, or run sprinklers or soaker hoses supplied from well or lake water inside the plastic to provide heat, which will help keep the temperature above the damaging point for hibiscus. It is extremely important to lift or remove this tent like covering after the temperature has risen above freezing but before the strong sun can shine through and scald the plants. The best thing of course is a glasshouse, constructed with either fibreglass or polyethylene sheeting. The glasshouse can be lined with bubble plastic in very cold areas to prevent damage, or heated. Plants can then be grown in containers and moved in and out according to season. The glasshouse will also help the plants recover after winter and the new growth will come away more rapidly. The glasshouse would also be invaluable when striking cuttings and grafting. Plants in containers can be taken indoors or moved to a verandah for protection when a severe frost is imminent. A sprinkler system may be used as protection by keeping the plants completely covered by a spray of water. Sprinklers should be started when the temperature reaches 1 °C and kept on until the sun is well up in the morning. Plants may ice over, but will be protected if the water is not shut off. After a cold snap uncover the plants to
provide sunlight and water if necessary. Plants that have been damaged
will need pruning (see section on pruning) but don't hastily grab for the
clippers. Wait until all danger of frost is past and let the plant show
for itself how much it should be cut back. Frozen or damaged stems will be
soft and pulpy, and when scraped the stem will be a brownish colour. Cut
back until the green shows. After a cold snap many growers give the plants
a light fertilising with a quick acting fertiliser to return them to a
good healthy growing condition. This fertilisation should be done
following a thorough watering of the plant. Try to protect hibiscus from the cold
prevailing winds that precede most cold waves. The dehydrating action of
these cold dry winds frequently causes more damage than the actual cold.
Wind damage to plants results in typical leaf burn or marginal browning.
As the plants dehydrate they develop damage similar to fertiliser burn.
Most of the damaged leaves will fall from the plant in a short time and
will be replaced by new leaves with the return of warm weather. Light
manuring and fertilising at this time will ensure a more rapid recovery of
the affected plants. Mulch preserves moisture from evaporation. It controls weed growth and lowers maintenance. Leaf mould, old seaweed that the salt has been hosed out from, old straw, spent mushroom compost and garden composts are all fine mulch materials. Pine bark should be avoided until it is very old. Damage has been done to hibiscus by resins leaching from certain barks which are toxic to plants. Weed mats also serve to prevent evaporation yet still allow the passage of air and moisture to the soil. Pests: Watch out for garden pests insects and diseases. The good gardener should be continually on the alert for signs that they are at work. Familiarise yourself with the symptoms of their presence. |
||||||