| The Chinese hibiscus is an evergreen shrub that would,
if conditions were suitable, keep growing all year. Evergreen shrubs are
treated differently from those that are deciduous. They may be pruned at
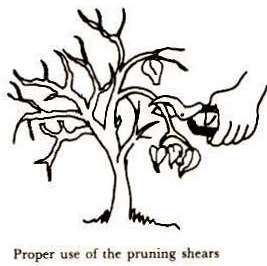
any time of the year to control the growth. Why Prune? The object of pruning is to modify the growth of the plant to fit the space in the garden, but more importantly to produce new wood for better flowering. The more vigorous and healthy the growth is, the larger and better the flowers. After a year or more under good fertiliser practices, the average hibiscus plant has produced a large amount of wood or branches. Often the plant has many sprawling branches that produce few flowers, or one or more verticals that spoil the look or shape of the plant. We prune to obtain a plant of the desired shape, to remove dead and weak growth, and to encourage the development of strong new growth where we want it. Equipment Needed First, make sure that you have clean sharp and adequate tools for the job: a good sharp knife for small wood, a pair of sharp pruning secateurs (spend the money for a good pair and throw the old ones away), a pair of sharp lopping shears for cuts up to 2.5. cm (1 in), a sharp pruning saw for anything larger, and a can of plant pruning paint, grafting tar or grafting wax. Some Hints on Sharpening your Pruning Tools A sharp file and a good quality stone can help keep your tools sharp. Some tools can be sharpened or touched up with abrasive paper held flat on a solid surface and used like a whetstone. The cardinal rule of tool sharpening is to retain the original bevel of the blade edge. This bevel was carefully engineered for maximum durability and easy cutting, and changing it causes problems. For instance, tools that cut with a slicing action and are not exposed to nicking injuries are ground with a long, thin edge. Examples include pruning shears and lopping shears (see line drawings). Shear blades cut better if the grinding or filing marks run at right angles to the cutting edge, so that each blade under the microscope would resemble a toothed saw. These blades must be filed, ground, or whetted on one side only. To remove metal on the flat side is to ruin the blade. The two cutting edges of a shear should kiss together continuously as the blades come together. Most secateurs and shears have bevels on only one side
of the blade. An exception is the anvil type pruning shear (see line
drawings) which is ground to a slender taper on both sides because it is
called upon to cut across the wood grain. This is one of the trickiest
tools to sharpen. The edge must be kept absolutely parallel with the face
of the brass anvil that helps make the cut. If too much metal is removed,
the blade and anvil will no longer come together properly and the cut
cannot be completed. This blade should be kept off the power grinder and
sharpened sparingly with oilstone only.
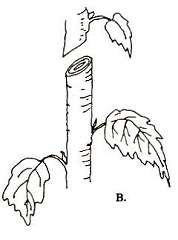
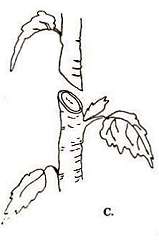
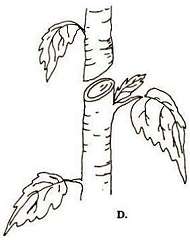
Then remove small twigs and branches that cross and grow toward the inside of the plant. This is to allow light and air to penetrate to the interior of the plant which will reduce fungus and insect problems. Locate the eyes or buds above the previous year's pruning and on the outside of the branches, and leave two or three. Cut at a slight angle with the bud eye on the high or upper side of the slant. This is called directional pruning. The strength will go to these topmost buds and growth will develop outwards, helping to keep the inside of the plant open for light and air. If however an arching or drooping shape is required, you should cut to an inside or topside bud on each branch to create more vertical branching. Cut out small intermediate branches.
If you wish remove all horizontal branches within 10 cm
(4 in) of the ground, cutting close to the stem or trunk. If there are a
number of strong upright stems, shorten them by at least a third and cut
to a top or side eye or bud, never to one pointing to the ground. Remember
that other dormant eyes will sprout branches below the cut. In a few weeks
the new shoots will appear and this is the time to apply a dressing of
organic fertiliser or manure. The real old timer bush that has large, old, hard wood produces small flowers because of the equivalent `hardening of the arteries'. The plant needs rejuvenation by drastic pruning. This calls for a pruning saw. On these old plants with stems and branches 5 7 cm (2 3 in) thick, it is best to saw them off 30 - 60 cm (1 - 2 ft) from the ground on a slant. A whole new hibiscus, bushy with nice foliage and better flowers will result. It may take a little longer to recover than a younger plant but the results will be worth the wait. Several growers prune drastically this way every four to five years to maintain vigour in their plants. After pruning particularly heavily, do not over water; because of the loss of leaf, the plants do not need and cannot cope with excessive moisture. For similar reasons, neither should you apply Nitrophoska or other chemical fertilisers. A general rule in pruning hibiscus is to cut the plants back one third all
over. You can, however, leave a few old stems intact that will provide a
few early blooms. Some of the older types produce their best blooms on old
matured wood and these should only be pruned lightly to maintain shape. A
mulch of either cow manure, spent mushroom compost, garden compost or leaf
mould is recommended after pruning. Some experienced growers have even pruned their plants in the middle of the flowering season around autumn. This means that they cut off all their flower producing wood, however, the plants shoot out immediately and have made up beautifully by winter. As the weather warms in spring the grower is then rewarded with a mass of flowers. This method of pruning can be employed when flowers of a particular variety are required most of the year around. By planting two plants of the variety needed and pruning one in spring and one in autumn a constant supply of blooms is assured. It is also handy when one is showing blooms or entering the garden in a spring garden competition. |