HIBISCUS CHAPTER TWELVE Propagation of Hibiscus The four main ways of reproducing plants from a particular variety are.
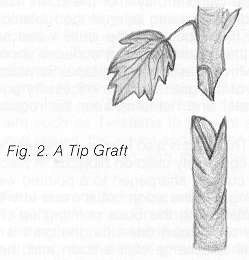
By using these four methods you are certain of reproducing the original variety. Mutations or Sports This sometimes occurs on a bush for no apparent reason. It is a freak of nature. One or more branches on a bush produces a completely different coloured flower, but usually has the same type of foliage, and in some cases, it can be lighter or darker. If the sport is good enough, it can be reproduced by any of the above methods. Do not be confused with shoots or branches of understock or rootstock of grafted plants. The foliage of rootstock is usually quite different from the top portion of the plant. If any of these branches appear from below the graft, cut them off immediately. Grafting Grafting is used to increase the number of plants from an existing variety or to establish a weak-growing variety on more vigorous roots. Cuttings of a strong rootstock such as arnottianus or Albo-Lacinatus are grown in pots to strong, sturdy plants with wood about the diameter of a pencil. If this understock plant is fed with a soluble fertilizer a week before grafting, growth of the scion will be accelerated. When choosing rootstock for grafting, varieties like schizopetalus that grow tall and whip-like are not recommended. They are small in girth, and scions grafted on them will grow larger in diameter than the stock, resulting in weak grafts. The most commonly used methods are side grafts, tip grafts, and veneer grafts (see line drawings). The variety to be grafted to the rootstock is called the scion. This wood is cut into lengths containing 2 or 3 eyes, showing green buds. If the buds are brown and dormant the scion will grow, but it will take longer. Using one of the three following methods, remembering that the lowest bud of the scion should fit close to the rootstock, this produces a straight and well-shaped plant. Protect the plant from wind and drying out until the buds emerge as leaves. A plastic bag may be placed over the plant until the graft is established to protect it from excessive drying. (Do not do this in the sun.) When the rootstock is a vigorously growing plant, within about 2-4 weeks a tissue, comparable to scar tissue in animals, will have formed over the cut surfaces of the graft. At this time the plastic tape holding the graft may be removed, although it is not advisable for at least 6-8 weeks. Loosen any stronger constraint such as Twistems to prevent'strangulation. Once the new buds have several leaves, the leaves and eyes on the rootstock may be cut out. The plant should carry a tag with the name of the scion and the date grafted. Many growers wax the grafts to prevent drying out and to exclude moisture and disease organisms. Use Grafting Wax or Grafting Tar. With a half-inch paint brush paint the wax on the entire graft, sealing it completely. You need not remove the wax from the plant; as the plant grows the wax will break off, when you remove the plastic grafting tape. The success of the grafting procedure is dependant upon acquiring a skill or "feel" in the operation. It takes a certain amount of practice to get this feel and the more grafting you do the better you become. You won't do it perfectly the first time, but each one gets better. When pruning a bush save a long branch to practice on, making one slanting cut after another until you can make even, regular cuts that will match perfectly on the sides. The knife must cut. Get the best knife you can find, keep it clean and sharp, protect its edge from contact with other tools, do not use it for any other purpose, and apply a thin coat of oil or vaseline when you put it away for any length of time. The knife is very important - and even more important is the edge that is sharpened on it. Get a good knife with the best steel if you want it to hold a good edge. Learn how to hone a fine edge with a good fine grain carborundum stone and then be able to whet a razor edge. Lay the blade almost flat on the stone and sharpen against the edge as though you were cutting the stone, and move the blade toward you at about a 30 degree angle. On alternate strokes, sharpen the other side in the same way. Some people like to move the blade in a circular motion on the stone, but be careful to keep the surface of the stone perfectly smooth and even. Plant fibres and the acids in the tissues slowly erode and corrode the fine knife edge, so the edge should be stropped now and then. If you keep a raw potato handy and run the knife edge through it occasionally the potato will clean the knife and help keep it sharp longer. For a few grafts some people use a single-edged razor blade of the old Gem type, as a single-use disposable cutting device. The knife should be able to slice through the stringy fibres of the scion and the stem of the understock at a small angle without bruising or tearing. That is why the knife and its edge are so important in making smooth cuts that match perfectly in even contact with all surfaces. It is not necessary to match both sides of the cambium
layers, for it is sometimes impossible to find a scion
exactlv the same size as the rootstock. But at least one
cambium layer of the scion must be in close contact with
the corresponding cambium layer of the rootstock. The
cambium is the soft green layer of tissue between the
white wood and the bark. Do not touch the cuts with the
fingers. The cut surfaces should be held together tightly
by wrapping with a plastic grafting tape. Sometimes
Twistems can be used. Rapid healing of the graft union is
necessary so that the buds of the scion may obtain water
and nutrients from the rootstock by the time they start
to open.
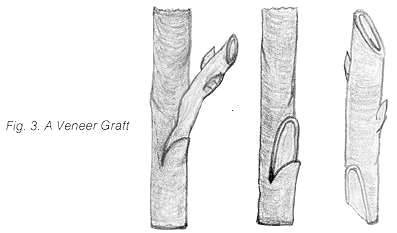
Veneer Graft. A smooth, shallow cut about one inch long is made diagonally into the rootstock. At the base of this cut, a second short inward and downward cut is made, intersecting the first cut, so as to remove the piece of wood and bark and leave a small notch in the rootstock.
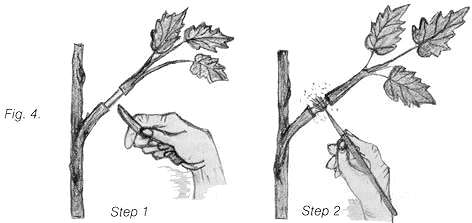
On the scion wood, make a long matching cut on one side and a very short one at the base on the opposite side. Fit the scion into the notch on the rootstock (Fig. 3), matching the cambium layer on at least one side, with the notch at the bottom of the rootstock forming a cap to cover the end of the scion wood. Bind tightly with grafting tape. This is also known as a chip graft and seems to provide the greatest number of "takes". While it is possible to place many grafts on a single large bush, this is not advised unless the grafts are later removed. Owing to the various growth habits of the scions, the stronger main plant will prevail. The grafts can be removed by air-layering, or they can be cut off after they are healthy growing plants and treated as cuttings in the mist box or in a pot. A grafted plant must be examined from time to time to detect shoots from the rootstock emerging from below the graft. These must be removed, as they may dominate or take over the entire plant and will often choke out the desired growth of the scion. In some cases, shoots from the scion will grow so vigorously that they will break off unless they are staked and tied or cut back. Hibiscus Cuttings Tip Cuttings. Proper handling of hibiscus cuttings is of prime importance in successfully developing new plants. Do not take a quantity of hibiscus cuttings and place them in a bucket of water. Submerge them in a solution of water and Formula 20 for a minute or so, then place them under a moist cloth or in a plastic bag with some water sprinkled inside the bag. Keep them out of the sun to prevent wilting. Take tip cuttings 1 0-1 5 cm (4-6 inches) long. Make a clean cut, dip in a hormone rooting powder, and place in the rooting medium. This can be sterile medium sand, vermiculite, perlite, peat, or a mixture of any of them. If the leaves are large they should have the leaf area reduced by half. Tubes are good to use for cuttings. Place under mist. Hardwood cuttings can also be made just as the tip cuttings are made, and put in the mist box. If you have no mist box, take hardwood cuttings about 15 cm (6 in) long and remove all leaves. Do not remove any eyes or green buds that are present. Then slice the end of the cutting up 2-3 cm (an inch) from the bottom to expose more cambium layer. Prepare a large pot by putting 2-3 cm (1 inch) of gravel or small stones in the bottom for drainage, then the perlite, peat and sand mixture. Then insert 10-20 of the cuttings into the mixture. They seem to develop better when there are many cuttings in the pot. When the callus has formed on the cambium layer, in 2 to 4 weeks remove and plant each one separately in a tube filled with soil, peat and perlite or vermiculite or let them establish their root system. To remove rooted cuttings without damaging their root system, separate them in a bucket of clean water and then pot on. There are many types of propagating units available to the home gardener or commercial growers to use. If there is no unit available to you, then plastic bags can be used to cover your cuttings. Use four stakes in your pot with the desired number of cuttings. Cover with the plastic bag and hold the bag in place with a strong rubber band. About four small air holes should be made in the plastic. Place in a warm position, not in the full sun, Air-Layering (marcottage, or mossing-off) provides a larger plant in a shorter time. The best time for air-layering is in warm weather. A healthy, upright-growing branch is girdied completely with two cuts about one inch apart and. the bark and green cambium are removed completely down to the white wood. A rooting powder may be applied to the upper side of the cut. (Fig. 4. Steps 1 and 2.)
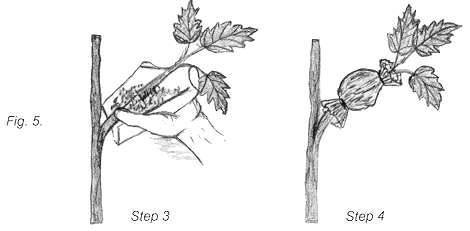
Use plain water and place sphagnum moss in it to soak. Next, squeeze a double handful of the well-soaked moss relatively dry and tie it around the cut area, held in place with a piece of plastic, then a 15 x 1 5 cm (6 x 6 in) sheet of aluminium foil. A layer of brown paper may be placed over the foil and tied securely. The plastic and foil will retain moisture, and the brown paper will exclude light and deter birds that may peck holes and let the moss get dry. (Fig. 5. Steps 3, 4.)
When examination shows that a good ball of roots has developed, the branch is cut off below the ball, and plastic and foil are carefully removed without disturbing the ball of roots and moss. Do not remove the moss. The end of the branch is then trimmed as close to the ball as possible, placed in a bucket of water containing Formula 20 solution, allow to get saturated, then pot and water thoroughly. It is advisable to cut back some of the leaves and to protect from wind and sun until the new plant is well established. Place the potted air-layer in light shade for 2 or 3 weeks for best results. Fertilize lightly in 30 days. Hybridize to Develop New Varieties In Australia the best time to hybridize is the period from April to August. The cooler weather is ideal. High temperatures dry out or inhibit the pollen so that it is not viable. Pollen may be stored in vials in the refrigerator until a wanted female parent blooms. Even before the blossom opens, the stigma pads are receptive to pollen. When the bloom first opens, the anthers bear light-coloured kidney-shaped sacs. As the morning progresses, these sacs open, dehisce is the technical term, and bright yellow pollen is exposed. This pollen is now ready to apply to the stigma pads of the selected pod parent or female. This may be done with a soft brush, or the bloom of the pollen parent may be picked and the pollen applied directly to the stigma pads, taking care to cover each pad thoroughly. Day-old pollen may be used if it has been kept in isolation, but the pod parent must be fresh, so that the stigma pads are sticky and the pollen will adhere to them. Each grain of pollen then grows a tube down through the style and hopefully fertilizes an ovule in the ovary. (See line drawing.)
At this point the cross should be entered in a stud book, giving the cross number, date, name of pod parent (female) and name of the pollen parent (male), leaving space to enter the date of harvest and number of seeds. This will all go on one line in the book. A light tag should be attached to the stem of the pollenated flower, giving the cross number, the date, and names of both parents, mother first and father second. When crossing two singles there is a much greater chance of getting singles than doubles, although doubles will occasionally result. When crossing a single and a double the chances of getting singles and doubles are roughly equal. Most double hibiscus, but not all, because of the arrangement of their floral parts, are useless as female parents although they can be used as pollen parents. After the petals fall the fertilized ovary enlarges. In a few days the calyx tips should be trimmed away carefully to prevent the harboring of insects. It is important to keep insects off the pod in the early stages, for sometimes insects will sting a seed capsule and one of the sections will die. More seeds are lost from insects than from any other cause. It is a good idea to carry with you in the garden a small squirt can of a mild solution of insecticide to spray the pods, or an insecticide dust. The pod will ripen in 40 to 90 days, some earlier, turning from apple green to light brown. At the earliest sign of cracking open, a square of nylon net may be tied around the pod to prevent loss of seed. When the pod cracks open it should be picked, the seeds counted, placed in a shallow container to dry, then transferred to an envelope or box and marked with cross number, date, and other information. In general, the larger the seed, the larger the flowers will be. Some hybridizers plant the seeds immediately, others let them dry for several days to several months. Before planting, a suitable medium must be obtained, such as compressed peat blocks, a mixture of vermiculite or perlite and peat or a mixture of sand and peat. A depression the size of the finger tip 1 cm (l/4 in) deep should be made in the mix, to receive the seed. It is important that the planting medium be sterile to avoid diseases. In profile, the seed appears much like a human head. Hold the seed by the face to protect the embryo and then with a single-edged razor blade nick or scalp the rounded top of the head until a white dot appears to hasten germination. If you have difficulty finding the top of the head, take the seed between your thumb and finger and roll it a couple of times and it will stop in the right position. Because it is tapered on the bottom it will stop with the narrow part down and you can nick the top of the head. Drop the seed in the depression you have made, cover with sterile sand, and moisten thoroughly. When properly nicked and planted, seeds germinate in 6 to 30 days. After the first four true leaves appear, the seedling should be potted, and if the peat blocks were used they must be covered with the potting soil. Use a sterile sandy soil. Be sure to keep baby seedlings on the dry side if they are in a heavy soil medium. Pots for young seedlings should be sterile. When they are quite small, seedlings can be planted directly to beds rather than pots in cooler weather. Hibiscus seedlings in full sun tend toward development of stocky, branched plants, with possibility of earlier bloom. Dense shade will definitely retard the first bloom. Tip cuttings from young seedlings will often outgrow the seedling and bloom earlier. Take about 4-inch tips when plants are 12 inches tall and place under mist or graft on suitable understock. Most seedings will bloom in 10 to 14 months. Some take much longer. Do not cut back, since this will delay blooming. Retain only the best, those with promise. Discard those which are undesirable. To help minimize the proliferation of undesirable seedlings, it is worthwhile to observe the plants for a year or two after they have begun to bloom before releasing them or registering them with the Australian Hibiscus Society. In your breeding programme, Iwould suggest using only prolific bloomers, with fully overlapped petals, with a heavy to medium textured flower. This should ensure that at least you will have quality. To be a worthwhile seedling it must have acceptable qualities that are better than any other variety in its colour range. Out of 20 seeds from a pod, each plant raised will be a different colour or colour tones. The Seed Bank. A seed bank is a vital part of the Australian Hibiscus Society's programme. Members of the society who are hybridizing and have more seeds than they care to plant are asked to send them to the Secretary of the Australian. Hibiscus Society. Include the following information: Parent identity - mother first then father - then date of cross. Place the seeds in an envelope, write the above information on the envelope, and protect with corrugated cardboard or place in a small box for mailing. Mark "Fragile" and "Please handle carefully". If you are sincerely interested in raising new varieties of hibiscus from seed, write to the Secretary, and seeds will be sent to you whenever they are available. The Australian Hibiscus Society now has a "Seedling of the Year" Competition as from 1978-79, and in future I would like to see a "Hibiscus of the Year" selected incorporating exotic hibiscus as well as Australian raised varieties. |